Using
Suggest editsAfter you have configured all of the Thales Certificates, as stated in the Configuring section, you will be able to use them in conjunction with your EDB Postgres distribution.
Note
It is important to note that this doc is intended for versions 15.2 and above of EDB Postgres Advanced Server and versions 15.2 and above of EDB Postgres Extended Server as these versions support Transparent Data Encryption (TDE).
To implement Thales CipherTrust Manger with your EDB Postgres distribution you must ensure that you have the following downloaded to your system:
- Python
- pykmip
- edb-tde-kmip-client downloaded from your EDB Repos access
All of the .pem files that you created in the Configuring section, key.pem, cert.pem and ca.pem, need to be copied to the system where your EDB Postgres distribution is installed. For our example, all of the .pem files and the edb_tde_kmip_client.py program are in the /tmp/ directory.
Check Prerequisites and Download edb-tde-kmip-client
Ensure that you have the prerequisite software (Python and Pykmip) installed on your system as stated in the Configuring section.
To install the edb-tde-kmip-client on your system assume root user and issue the install command for edb-tde-kmip-client. For our example we installed it on a RHEL8 Server so it would be dnf install edb-tde-kmip-client.
You should receive some output that looks like the following:
[root@ip-172-31-7-145 ec2-user]# dnf install edb-tde-kmip-client
Updating Subscription Management repositories.
Last metadata expiration check: 0:00:59 ago on Thu 06 Jul 2023 01:30:54 PM UTC.
Dependencies resolved.
================================================================================
 Package              Arch    Version     Repository                       Size
================================================================================
Installing:
 edb-tde-kmip-client  noarch  1.0-1.el8   enterprisedb-enterprise-noarch   14 k

Transaction Summary
================================================================================
Install  1 Package

Total download size: 14 k
Installed size: 20 k
Is this ok [y/N]: y
Downloading Packages:
edb-tde-kmip-client-1.0-1.el8.noarch.rpm         23 kB/s |  14 kB     00:00
--------------------------------------------------------------------------------
Total                                            23 kB/s |  14 kB     00:00
Running transaction check
Transaction check succeeded.
Running transaction test
Transaction test succeeded.
Running transaction
  Preparing        :                                                        1/1
  Installing       : edb-tde-kmip-client-1.0-1.el8.noarch                   1/1
  Verifying        : edb-tde-kmip-client-1.0-1.el8.noarch                   1/1
Installed products updated.

Installed:
  edb-tde-kmip-client-1.0-1.el8.noarch

Complete!
Create pykmip.conf File
On your system where you have your EDB Postgres distribution, navigate to the directory where you have saved your
*.pemfiles and theedb_tde_kmip_client.pyclient.In that directory create a file called
pykmip.confand input the following:
- Host
- Port
- Username
- Password
- Keyfile
- Certfile
- Ca_certs
For example:
edb@debian:~$ cat /tmp/pykmip.conf
[client]
host=172.22.20.194
port=5696
username=testuser123
password=Adminedb@123
keyfile=/tmp/key.pem
certfile=/tmp/cert.pem
ca_certs=/tmp/ca.pem
Note
For more information on the pykmip.conf file and the contents of it you can visit the pykmip documentation.
Create a Key on Thales CipherTrust Manager
There are two ways you can create a key with Thales CipherTrust Manager. You can create one locally with python3 or you an use the Thales CipherTrust Manager UI.
Use one of the two methods listed below to proceed.
Create a Key Locally with python3 on Thales CipherTrust Manager
On your system with your EDB Postgres distribution, login as the superuser of the database to create the key on Thales CipherTrust Manager.
Type
python3and then input the following, making adjustments per your system setup and directory paths:
>>> from kmip.pie import client
>>> from kmip import enums
>>> c = client.ProxyKmipClient(config_file='/tmp/pykmip.conf')
>>> c.open()
>>> key_id = c.create(enums.CryptographicAlgorithm.AES, 128, name='edbtestkey')
(`edbtestkey` is the name that we chose for our TDE master key. Alter this per your naming requirements.)
>>> c.activate(key_id)
>>> key_id
>>> 'key_output_shows_here'
>>> c.close()
Navigate back to Thales CipherTrust Manager, and select
Keyson the navigation bar.Check that your key, in this case
edbtestkey, has been created.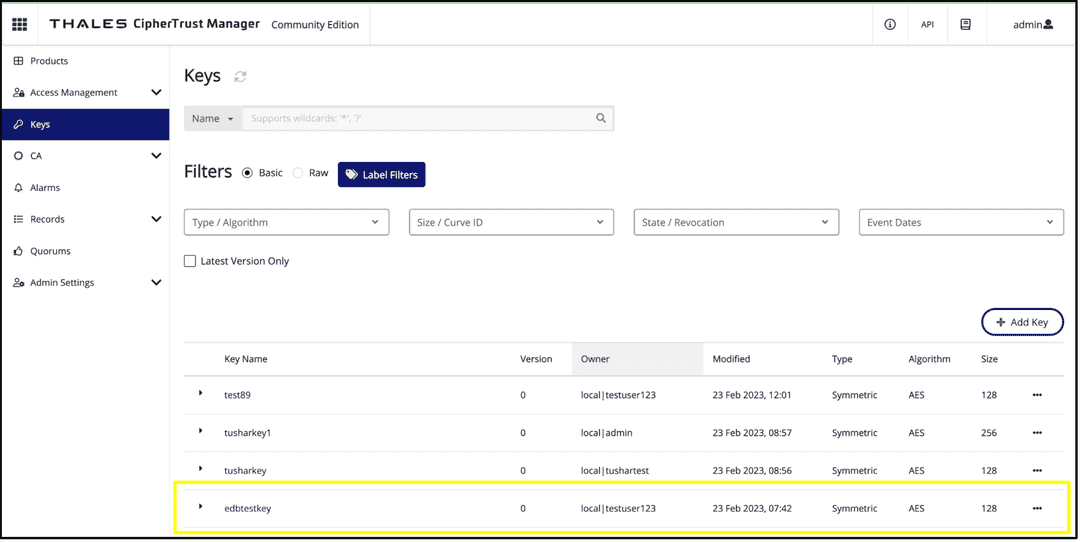
Create a Key on Thales CipherTrust Manager UI
You may also create Keys on the Thales CipherTrust Manager UI to use in your database WRAP and UNWRAP commands for encryption.
Login to Thales CipherTrust Manager.
On the main page, select
Keysfrom the left bar.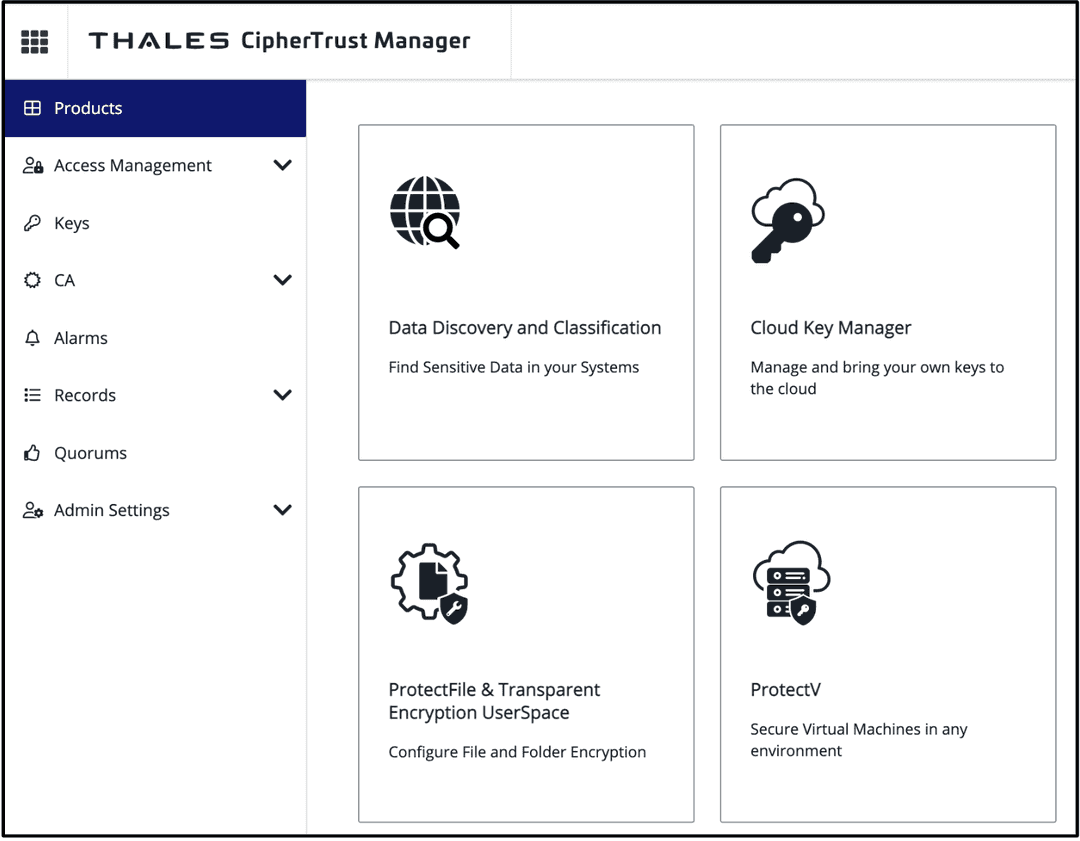
Select
Add Keyto create a new key.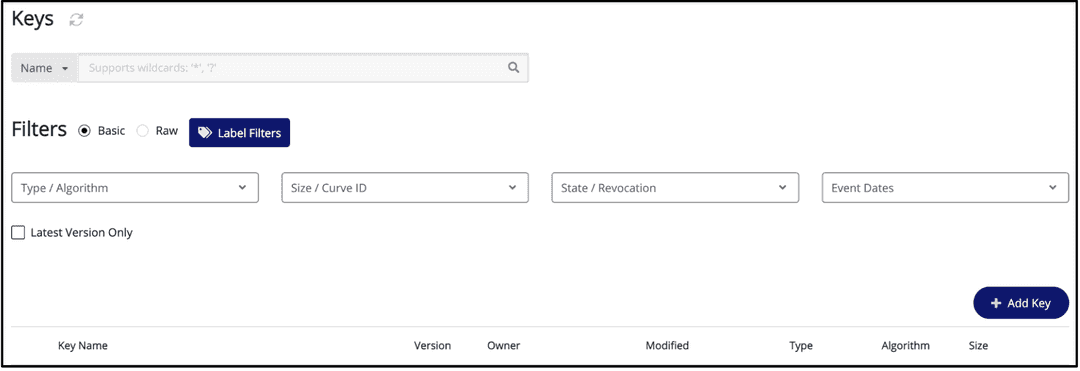
Give the key an identifiable name, and select the
Key PropertiesandKey Usageboxes per your requirements.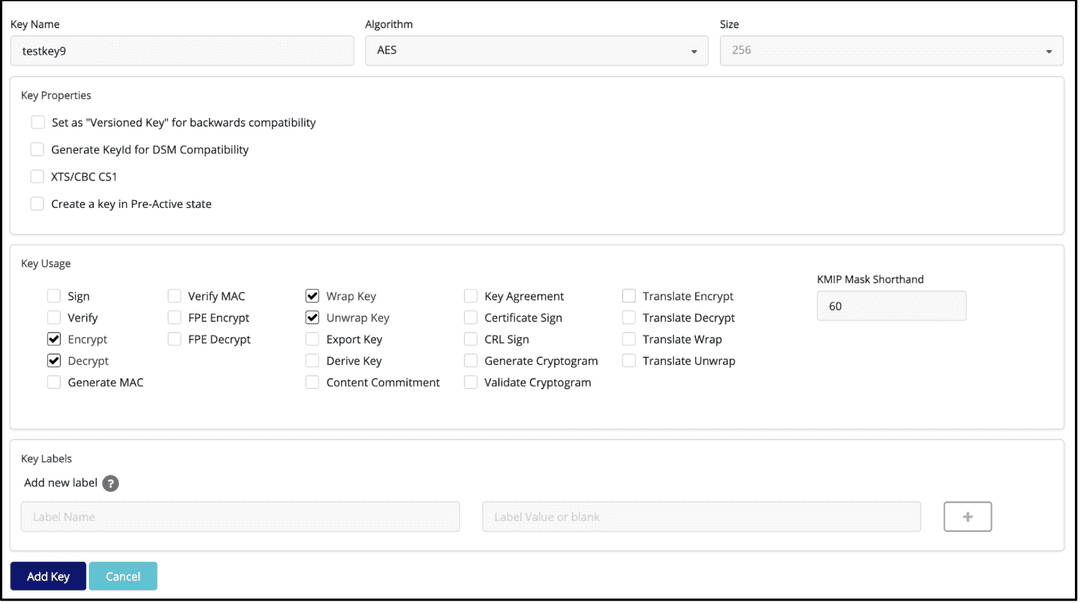
Select
Add Key.After you select
Add Key, you will be taken to that key's page with specific information.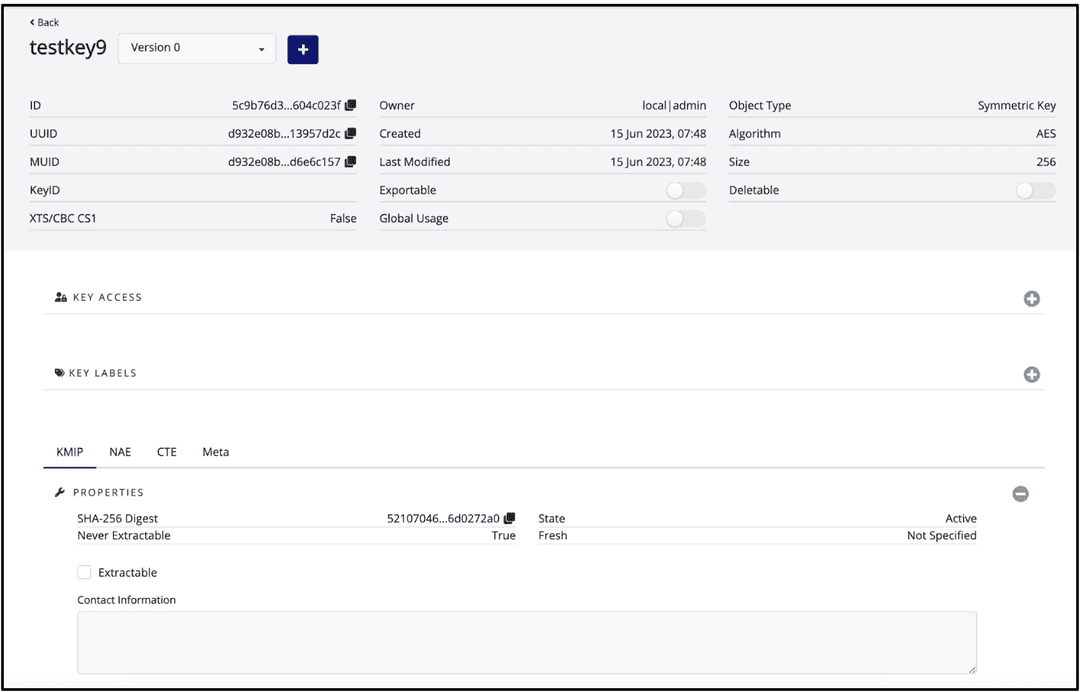
The specific key ID that is needed for your PGDATAKEYWRAPCMD and PGDATAKEYUNWRAPCMD commands is the
IDwhich is shown at the top of your key information page.
Verify Encryption and Decryption
To ensure that your key that you created will be able to encrypt and decrypt data, run the following two commands as the superuser on your system where you have your EDB Postgres distribution.
printf secret | python3 /tmp/edb_tde_kmip_client.py encrypt --out-file=test.bin --pykmip-config-file=/tmp/pykmip.conf --key-uid='key_output_here’ --variant=thales
- Location of the KMIP Client: /tmp/edb_tde_kmip_client.py
- Output file: test.bin
- Location of pykmip configuration file: /tmp/pykmip.conf
- Encrypted Key Output: TDE key output
- Variant: Allows for KMIP compatibility with Thales
python3 /tmp/edb_tde_kmip_client.py decrypt --in-file=test.bin --pykmip-config-file=/tmp/pykmip.conf --key-uid='key_output_here' --variant=thalesIf this is successful it should produce the output of secret.
printf secret | python3 /tmp/edb_tde_kmip_client.py encrypt --out-file=test.bin --pykmip-config-file=/tmp/pykmip.conf  --key-uid='72cb431904fe4dd0a77207b03bff7755be6265cd7f6f463bb0e59023ec5456f4' --variant=thales

python3 /tmp/edb_tde_kmip_client.py decrypt --in-file=test.bin --pykmip-config-file=/tmp/pykmip.conf --key-uid='72cb431904fe4dd0a77207b03bff7755be6265cd7f6f463bb0e59023ec5456f4' --variant=thales
secret
Perform initdb for the Database
After you have completed the above steps you will be able to export the PGDATAKEYWRAPCMD and PGDATAKEYUNWRAPCMD to wrap and unwrap your encryption key and initialize your database.
Login to your EDB Postgres distribution system as the database superuser. For our example: enterprisedb user,
sudo su - enterprisedb.Navigate to the
/bindirectory where your executables live. In our example it is/usr/lib/edb-as/15/bin.Type:
export PGDATAKEYWRAPCMD='python3 /tmp/edb_tde_kmip_client.py encrypt --pykmip-config-file=/tmp/pykmip.conf --key-uid=key_ouput_here --out-file=%p --variant=thales’Type:
export PGDATAKEYUNWRAPCMD='python3 /tmp/edb_tde_kmip_client.py decrypt --pykmip-config-file=/tmp/pykmip.conf --key-uid=key_output_here --in-file=%p --variant=thales’
For our example:
enterprisedb@ip-172-31-46-134:/usr/lib/edb-as/15/bin$ export PGDATAKEYWRAPCMD='python3 /tmp/edb_tde_kmip_client.py encrypt --pykmip-config-file=/tmp/pykmip.conf --key-uid=72cb431904fe4dd0a77207b03bff7755be6265cd7f6f463bb0e59023ec5456f4 --out-file=%p --variant=thales'

enterprisedb@ip-172-31-46-134:/usr/lib/edb-as/15/bin$ export PGDATAKEYUNWRAPCMD='python3 /tmp/edb_tde_kmip_client.py decrypt --pykmip-config-file=/tmp/pykmip.conf --key-uid=72cb431904fe4dd0a77207b03bff7755be6265cd7f6f463bb0e59023ec5456f4 --in-file=%p --variant=thales'
Perform your initdb per your database requirements, for example:
./initdb -D dd12 -y.If all is successful you should get an output that looks like this:
    edb@debian:~$ /usr/lib/edb-as/15/bin$ ./initdb -D /var/lib/edb-as/15/dd12 -y
    The files belonging to this database system will be owned by user "edb".
    This user must also own the server process.

    The database cluster will be initialized with locale "en_US.utf-8".
    The default database encoding has accordingly been set to "UTF8".
    The default text search configuration will be set to "english".

    Data page checksums are disabled.
    Transparent data encryption is enabled.

    creating directory dd12 ... ok
    creating subdirectories ... ok
    selecting dynamic shared memory implementation ... posix
    selecting default max_connections ... 100
    selecting default shared_buffers ... 128MB
    selecting default time zone ... Asia/Kolkata
    creating configuration files ... ok
    setting up data encryption ... ok
    running bootstrap script ... ok
    performing post-bootstrap initialization ... ok
    creating edb sys ... ok
    loading edb contrib modules ...
    edb_redwood_bytea.sql
    edb_redwood_date.sql
    dbms_alert_public.sql
    dbms_alert.plb
    dbms_job_public.sql
    dbms_job.plb
    dbms_lob_public.sql
    dbms_lob.plb
    dbms_output_public.sql
    dbms_output.plb
    dbms_pipe_public.sql
    dbms_pipe.plb
    dbms_rls_public.sql
    dbms_rls.plb
    dbms_sql_public.sql
    dbms_sql.plb
    dbms_utility_public.sql
    dbms_utility.plb
    dbms_aqadm_public.sql
    dbms_aqadm.plb
    dbms_aq_public.sql
    dbms_aq.plb
    dbms_profiler_public.sql
    dbms_profiler.plb
    dbms_random_public.sql
    dbms_random.plb
    dbms_redact_public.sql
    dbms_redact.plb
    dbms_lock_public.sql
    dbms_lock.plb
    dbms_scheduler_public.sql
    dbms_scheduler.plb
    dbms_crypto_public.sql
    dbms_crypto.plb
    dbms_mview_public.sql
    dbms_mview.plb
    dbms_session_public.sql
    dbms_session.plb
    edb_bulkload.sql
    edb_gen.sql
    edb_objects.sql
    edb_redwood_casts.sql
    edb_redwood_strings.sql
    edb_redwood_views.sql
    utl_encode_public.sql
    utl_encode.plb
    utl_http_public.sql
    utl_http.plb
    utl_file.plb
    edb_ht_public.sql
    edb_ht.plb
    utl_tcp_public.sql
    utl_tcp.plb
    utl_smtp_public.sql
    utl_smtp.plb
    utl_mail_public.sql
    utl_mail.plb
    utl_url_public.sql
    utl_url.plb
    utl_raw_public.sql
    utl_raw.plb
    commoncriteria.sql
    edb_gen_redwood.sql
    waitstates.sql
    installing extension edb_dblink_libpq ... ok
    installing extension edb_dblink_oci ... ok
    snap_tables.sql
    snap_functions.sql
    sys_stats.sql
    ok
    finalizing initial databases ... ok
    syncing data to disk ... ok

    initdb: warning: enabling "trust" authentication for local connections
    initdb: hint: You can change this by editing pg_hba.conf or using the option -A, or --auth-local and --auth-host, the next time you run initdb.

    Success. You can now start the database server using:

    pg_ctl -D dd12 -l logfile start
- Start your database and navigate to your
/datadirectory to view the postgresql.conf file to ensure that yourdata_encryption_key_unwrap_command, which you set with yourexport PGDATAUNWRAPCMD, is present under the Authentication section.
# - Authentication -

#authentication_timeout = 1min          # 1s-600s
#password_encryption = scram-sha-256    # scram-sha-256 or md5
#db_user_namespace = off

# GSSAPI using Kerberos
#krb_server_keyfile = 'FILE:${sysconfdir}/krb5.keytab'
#krb_caseins_users = off

# - SSL -

#ssl = off
#ssl_ca_file = ''
#ssl_cert_file = 'server.crt'
#ssl_crl_file = ''
#ssl_crl_dir = ''
#ssl_key_file = 'server.key'
#ssl_ciphers = 'HIGH:MEDIUM:+3DES:!aNULL' # allowed SSL ciphers
#ssl_prefer_server_ciphers = on
#ssl_ecdh_curve = 'prime256v1'
#ssl_min_protocol_version = 'TLSv1.2'
#ssl_max_protocol_version = ''
#ssl_dh_params_file = ''
#ssl_passphrase_command = ''
#ssl_passphrase_command_supports_reload = off

# - Data Encryption -

data_encryption_key_unwrap_command = 'python3 /tmp/edb_tde_kmip_client.py decrypt --pykmip-config-file=/tmp/pykmip.conf --key-uid=72cb431904fe4dd0a77207b03bff7755be6265cd7f6f463bb0e59023ec5456f4 --in-file=%p --variant=thales'
For more information on how TDE is incorporated with EDB Postgres Advanced Server and EDB Postgres Extended Server visit the EDB Transparent Data Encryption documentation.
Could this page be better? Report a problem or suggest an addition!